Tour Divide Bikepacking Cockpit Setup
My bicycle cockpit for the Tour Divide took me a while to dial in, and I’m still not sure it’s reached its final form. That said, it served me well, and I thought it worth sharing in the interest of potentially saving someone out there some time and/or hassle when dialing in their setup.
I’ve already done comprehensive breakdowns of my Tour Dvidie rig and my Tour Divide gear, but both of these fail to accurately describe one of the trickiest parts of my Tour Divide rig.
The following covers my Tour Divide bikepacking cockpit setup – including all the gear that went into putting it together, what worked, what didn’t, and the changes I’m thinking about making for my next bikepacking trip.

The Handlebars
I used the stock drop-bar handlebars that came with my Salsa Cutthroat GRX 600 (56 cm). According to the build specs, these are the Zoom DR-AL-199BTFOV. I also used the stock Salsa stem (although I considered changing it out for a Redshift Sports ShockStop PRO Suspension Stem – I used the Redshift Sports ShockStop Suspension Seatpost, which was great).
You can read a more detailed breakdown of my Tour Divide rig here.
The Bags
I’m including four bags in my cockpit setup: my Rockgeist feed bags, Rogue Panda handlebar roll, and Tailfin top tube bag. I also used the Rogue Panda Blue Ridge Handlebar Harness with Austere Mfg Cam Buckles to support my handlebar roll (a Rogue Panda Gila Dry Bag).
- Handlebar Harness: Rogue Panda Blue Ridge Handlebar Harness (Austere Mfg Cam Buckles)
- Handlebar Roll: Rogue Panda Gila Dry Bag (Small, Ultra 200X Black)
When I started the Tour Divide, the Blue Ridge Handlebar Harness was brand new from Rogue Panda; I got it just a few months before the Grand Depart. I liked the idea of keeping my bag off my handlebars/fork, and since I didn’t plan to carry a lot of weight in my handlebar roll (I carried my shelter, poles, and quilt in it), I suspected the Blue Ridge would be more than capable – it was.
One thing to note here is that because my bike has drop bars, I had limited space between them to accommodate my front roll. Leaving my Gila Dry Bag uncompressed would interfere with my braking and/or shifting (no bueno). I used the Gila Dry Bag in a size small and it was still a bit larger than I would have liked (an extra small would have been better – if it existed).
- Feed Bag 1: Rockgeist Honeypot Feedbag (Ultra 400 Black)
- Feed Bag 2: Rockgeist Honeypot Feedbag (X50 Marigold)
- Feed Bag Accessory: Rockgeist Spacelink

I used two Honeypot Feedbags from Rockgeist in my cockpit. They attach via velcro straps around the handlebars and also have straps that loop around the bike’s fork. The Spacelink is a steerer tube spacer that allows you to anchor the feedbags to the bike’s stem. I never had any issues with the feedbags coming loose or getting wobbly. I typically kept a water bottle in one and snacks in the other (as well as some miscellaneous items in the exterior mesh pockets on the feedbags).
One more thing that doesn’t really fit anywhere else in this gear list but that I guess could fit here since it sits just above the Rockgeist Spacelink is my jefe Headset Cap Airtag Mount and Apple AirTag. The jefe Cap replaces my stem cab and allows me to hide an AirTag inside of it. Yes, I will have bigger problems if I need to end up locating my bike with an AirTag on the Tour Divide, but it’s still a tiny peace of mind to know that my bike will (maybe) be able to be located should it go missing. At the very least, it gave me confidence on my flight.
- Top Tube Bag: Tailfin Top Tube Bag (Flip, 1.5L)

Is your top tube bag considered part of your cockpit? If it’s not, I feel like it certainly should be. I used the 1.5L (larger) flip version of the Tailfin Top Tube Bag and was incredibly happy with it. It offers direct-mount capability (but can also be attached with straps), has an interior pocket/sleeve, a cable entry gland at the front, and is waterproof. I got the larger version because I wanted to be able to store extra gear and snacks here, and despite being afraid my knees would hit it, this was not an issue. There’s a zippered version available, but I went with the flip version as I suspected it would be more waterproof; I had no issues accessing and closing this bag with one hand.
Here’s what I carried in my top tube bag:
- Multitool: Park Tool I-Beam Mini Tool
- Headlamp: BioLite HeadLamp 325
- Hand Sanitizer: Dr. Bronner’s Organic
- Power Bank: Nitecore Carbo 20000
- Headphones: Pixel Buds Pro
- Cable: USB-C to USB-C
- Utensil: Snow Peak Long Titanium Spork
- Gear Repair: Gorilla Tape
- Lots of snacks
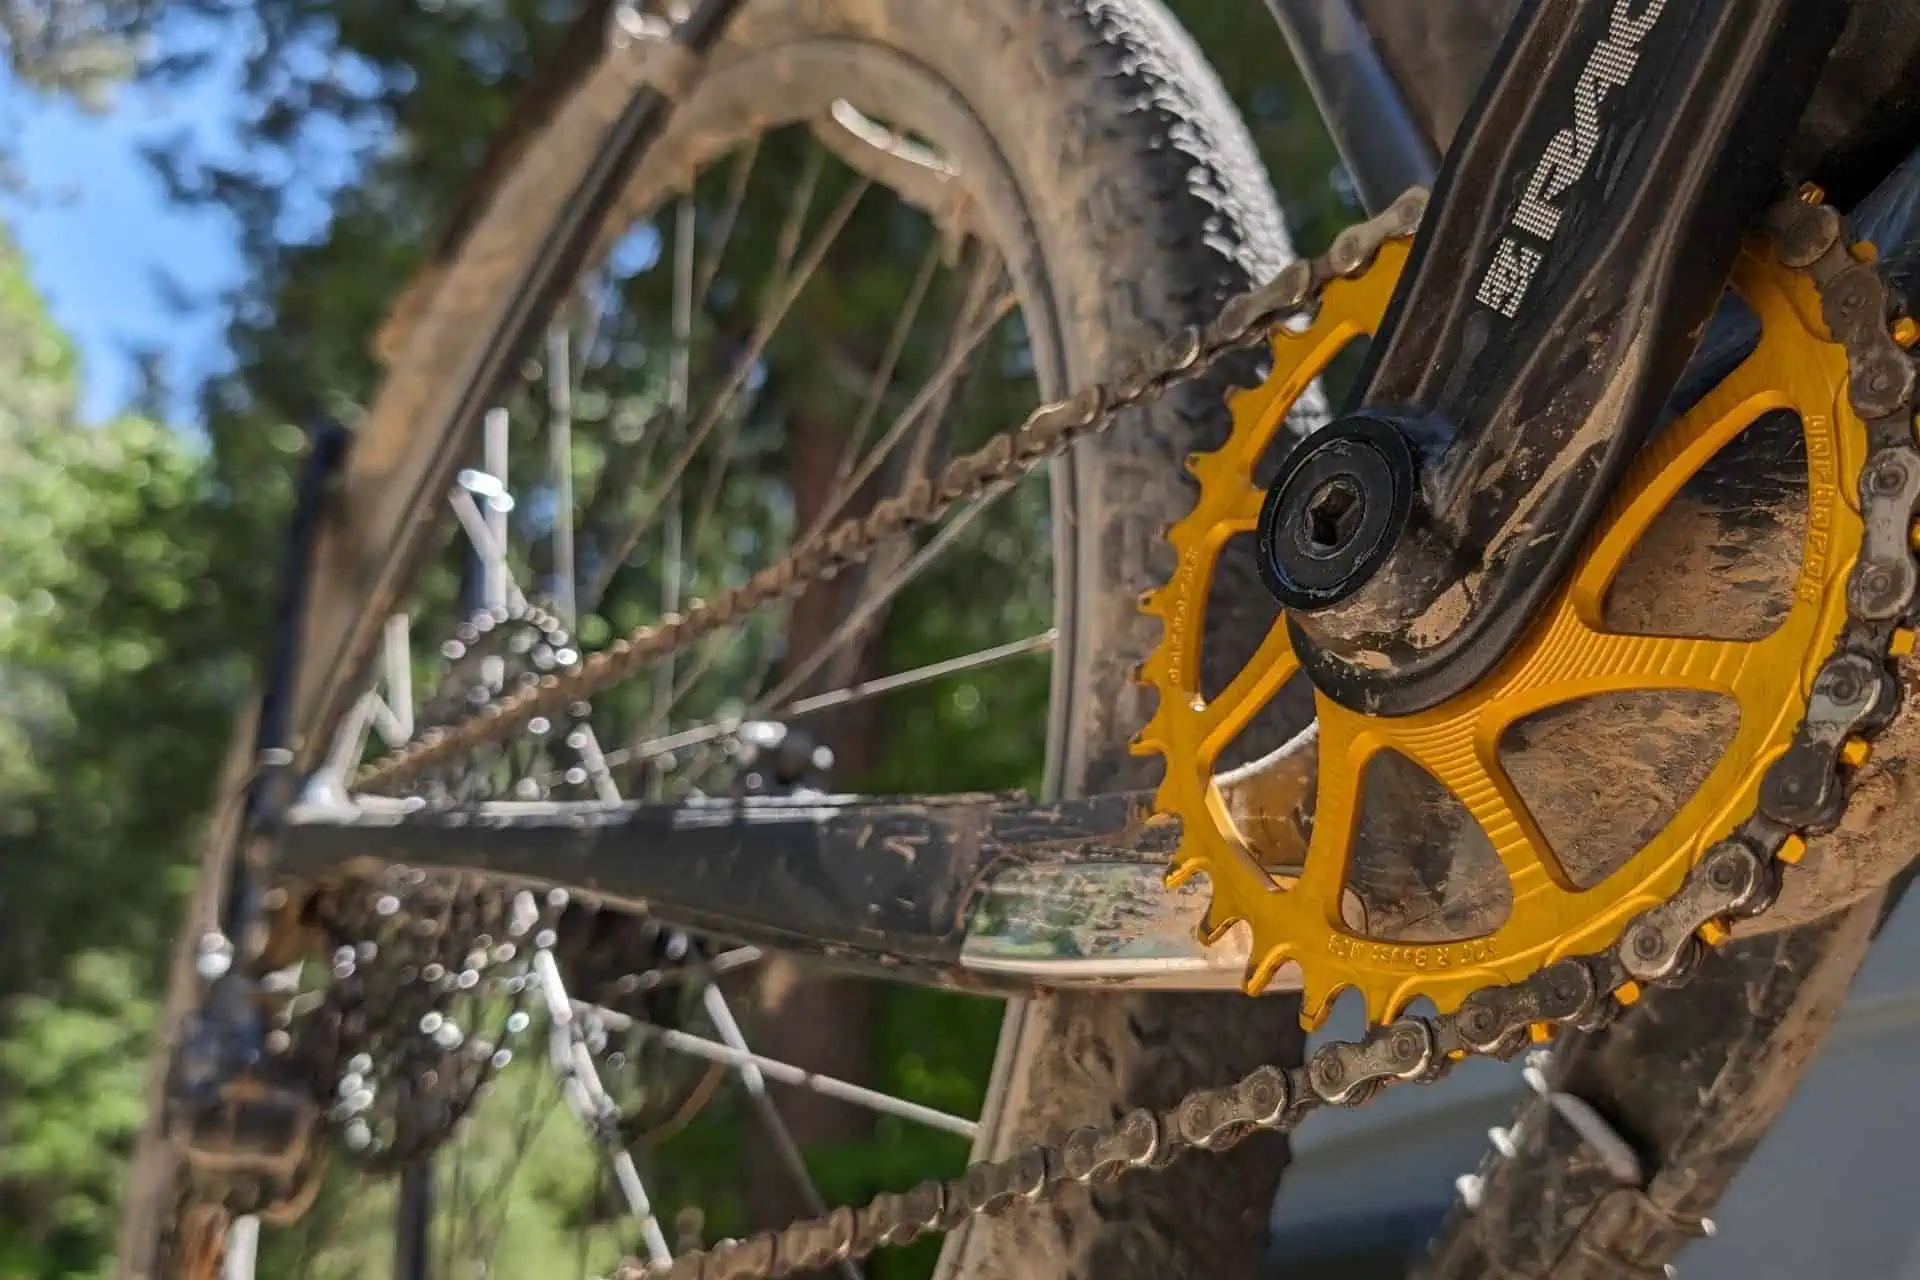
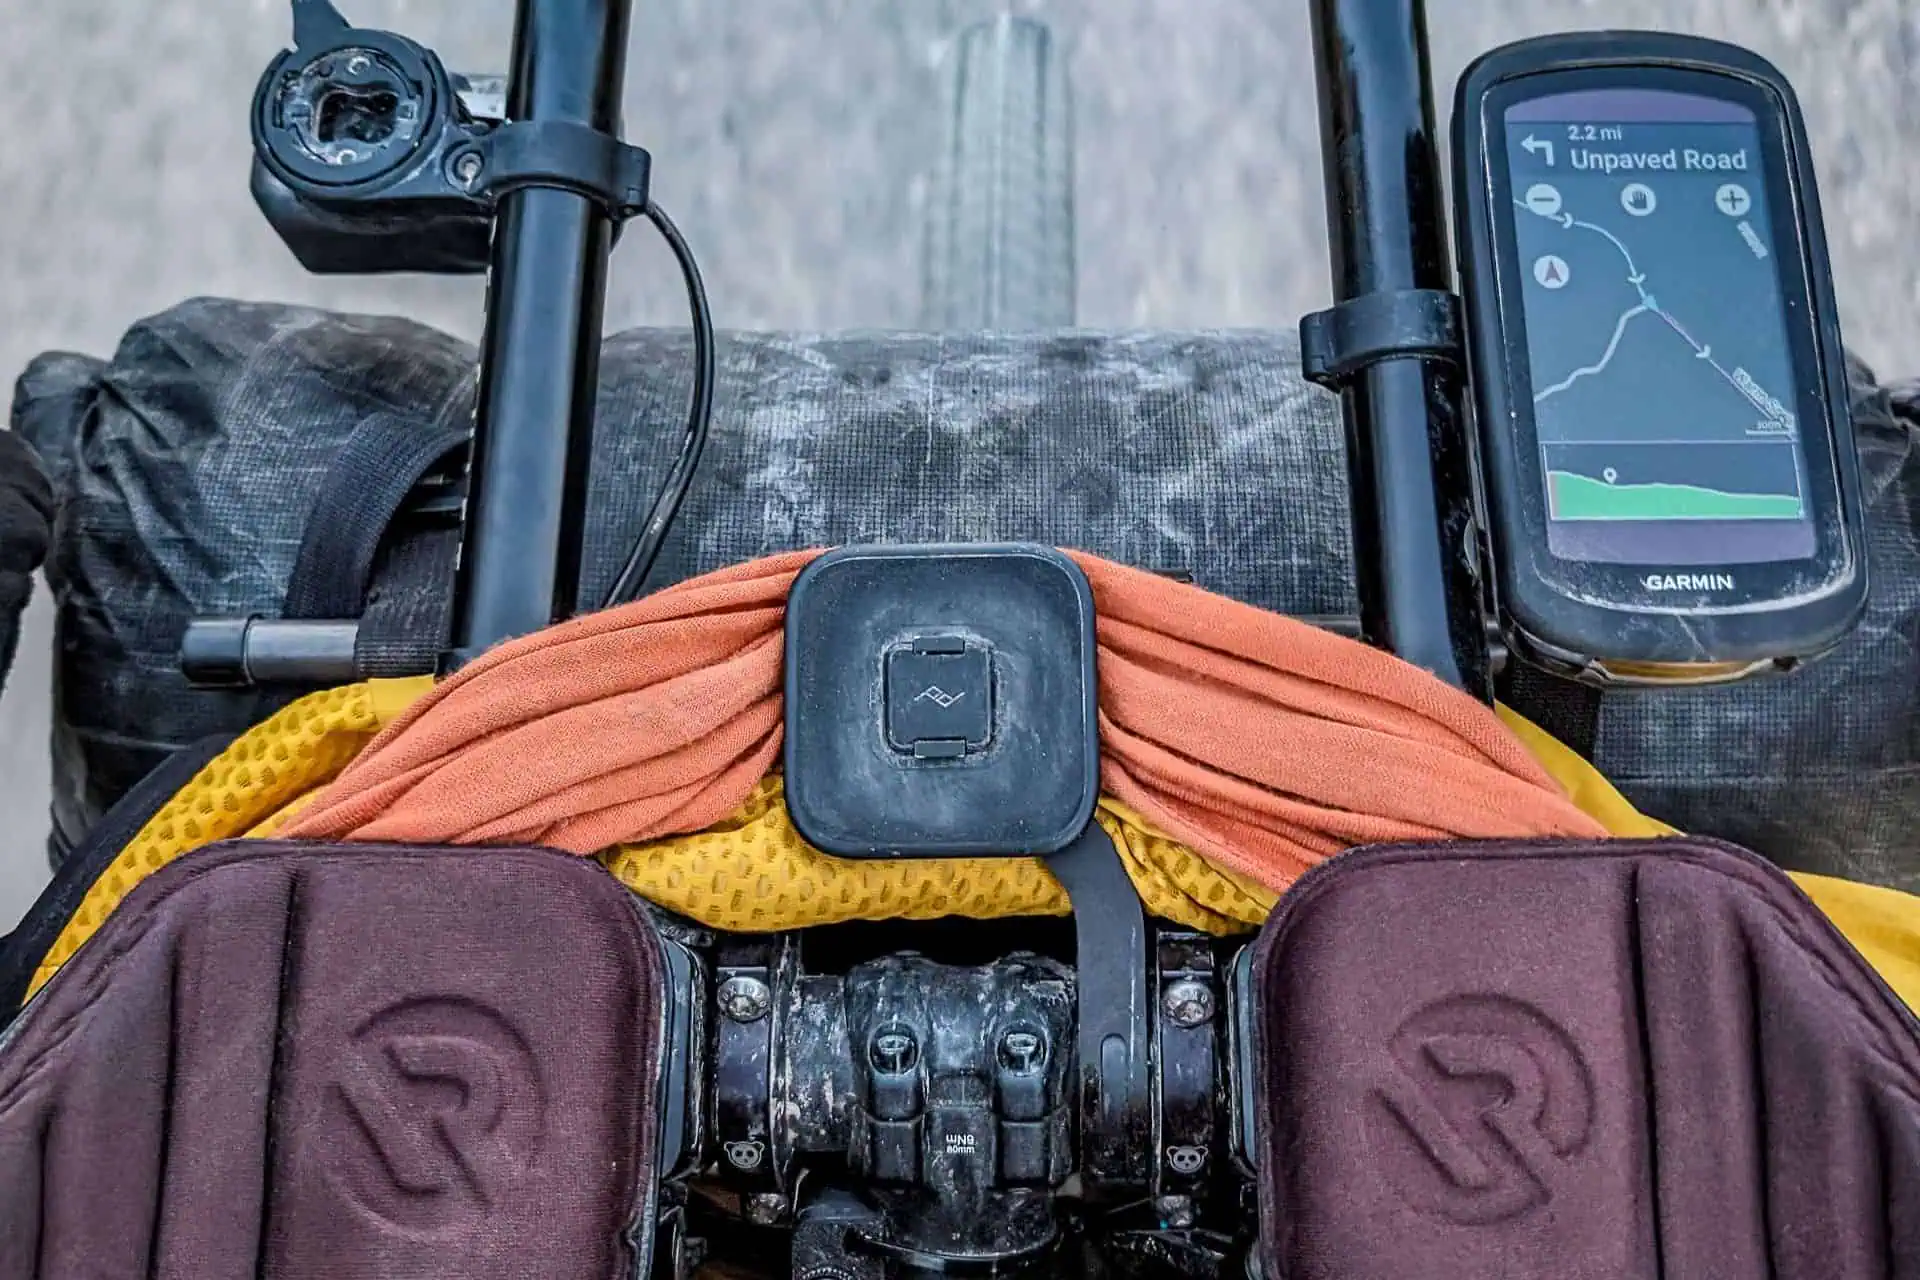
Cockpit
Maybe the easiest way to describe my cockpit is to start at the center – where my stem attaches to my handlebars – and work my way out. As mentioned above, my stem and handlebars were stock with my Cutthroat. Immediately to the right of my stem, I had the Peak Design Out Front Bike Mount V2 attached to my bars.
Paired with the Peak Design Everyday Case (don’t worry, there’s an iPhone, Samsung, and Universal Adapter available too), this kept my phone out in front and in the middle of my cockpit. I experimented with having my phone mounted on my stem as well by using the Peak Design Universal Bar Mount, but I found that this interfered too much with my aerobars (more on these coming up).
The Peak Design system is super secure and allows for each one-handed operation of the locking mechanism that keeps the phone attached to the mount. I’ve found it preferable to the Quad Lock system (which I used on my bicycle crossing of Australia).
Moving out on the handlebars from my phone mount I attached each of the two clamps on the Rogue Panda Blue Ridge Handlebar Harness which I cover above. These are not in a fixed position relative to one another so they can be attached anywhere along your handlebars. I felt this was a bit on the narrower side, but I don’t think where I placed these brackets had any real effect on the harness’s performance.
One thing to note is that because of the aero bars I used (which I’ll cover next), I had to angle the harness steeply downward to keep it clear of the aerobars.
The Redshift Quick-Release Clip-On Aero Bars (L Bend) were somewhat the centerpiece of my cockpit. I hadn’t anticipated beforehand how much they would get in the way/dictate the positioning of everything else. Still, ultimately I figured it out and got them to play nice with everything else.
These attach via two clamps on your handlebars. I placed each immediately outside the two clamps from the Blue Ridge Harness (as in right up against them). The issues I had to contend with were keeping the elbow pads far enough apart that my phone would still fit between them (this would likely be easier if I had the normal instead of the XL version of my phone), ensuring the pads/platforms would not be blocking access to my feedbags, and making sure I would still have enough space on my handlebars to grip them with my hands.

The Redshift Quick-Release Clip-On Aero Bars have a high degree of adjustability, and I could—without much trouble—adjust the elbow pads so that none of the above concerns proved to be an issue. At the end of my aero bars, I put on a pair of Wolf Tooth Components Karv Grips. I spent a lot of time on my aero bars, and these were a great investment. It was tough getting them on, but by using some K-Y Jelly, I could accomplish this task without too much trouble.
Beyond access to my feedbags, space for my phone, and room for my hands, I wanted enough space on my handlebars to put on the Redshift Cruise Control Drop Bar Grips. This is a four-piece system with two pieces that slide onto the end of your drop bars and two pieces that augment the flat part of your bars; the latter was the one I feared I would have an issue with since I had already taken up so much of my handlebar real estate with other components. Fortunately, I could smash everything far enough into the middle that this was not an issue.
I spent a lot of time on my aero bars (probably more than 50% of my time riding), and it was worth getting everything dialed before starting the Divide.
Lights and Charging
I ran a dynamo hub on my bike (full specs here), and so I had a wire coming up from my front wheel to my cockpit that fed into a switch, which in turn fed into both a brick with USB ports for charging and also to my light. The switch, ideally, gets mounted somewhere easily accessible as it controls power diversion between either the light or the USB ports.
Because my stem was free of my phone, I had just the right amount of space to attach the switch to my bike’s stem with some zip ties. I then ran the cable for my light out to my left aero bar where my light was mounted and ran the cord for the USB ports into the cable entry gland at the front of my top tube bag.
The next issue I encountered was where to mount my bike’s computer, light, GoPro, and Garmin inReach Messenger. I had played with handlebar mounts, out-in-front mounts, stem mounts, and more. Ultimately, I decided to use two Garmin Edge TT/Tri Bar Mounts—one on each of my aero bars.
I mounted my kLite ULTRA to the underside of the mount on my left aero bar (the TT/Tri Bar Mounts have both top and bottom mounting capabilities). I just had to make sure the mount was positioned far enough forward that my handlebar roll and light wouldn’t be in the way of one another.
Running the cable for the light out to the end of my aero bar wasn’t an issue. I used a zip tie on the aero bar (positioned below the arm pad so it was out of the way) to keep the cable from getting in the way.
Electronics
As mentioned above, the last things I had to find space in my cockpit were my bike’s computer, GoPro, and Garmin inReach Messenger. Originally, I planned to use the Garmin inReach Mini 2, but after realizing the Garmin inReach Messenger would serve the same purpose with a longer battery life, I went with the Messenger instead.
The issue was then attaching the messenger to my bike. I suppose it didn’t have to be, but I was worried it would chafe me if I kept it in a bib pocket.
I previously bought this adapter from jefe to attach my inReach Mini 2 to the Garmin Edge TT/Tri Bar Mounts. However, since the Garmin Messenger doesn’t have the bolt on its back, which the adapter uses to attach to the Garmin Mini, I was unsure how to attach it. In the end, I used some VHB tape, which worked well.
Note: At one point, a small piece of the adapter broke, preventing my Garmin Messenger from properly clipping into the mount. My Messenger then fell off my bike without me noticing. Luckily, I was able to backtrack and find it. If you’re going to do something similar, I suggest using a string around the Messenger and then around your aero bars or handlebars to back up the mount.
I attached another Garmin Edge TT/Tri Bar Mount to my right aero bar—this one for my computer and GoPro. This mount needed to be placed far enough back on the bar that my Garmin Edge Bike Computer wouldn’t hit the Wolf Tooth Components Karv Grips I put on the end of my aero bars.
Fortunately, placing it further back did not affect my ability to rest on my aero bars, and I couldn’t even notice it was there while riding. However, I sometimes unintentionally changed the menu page with my forearm. Unfortunately, because this mount needed to be placed further back, I could not attach my GoPro to the bottom of it because my front roll was in the way. This is something I probably could have forseen, but that I didn’t discover until I was in Banff prepping my bike for the Grand Depart.
Ideally, I would have figured out a mount that would have allowed me to place my GoPro between my aero bars. Instead, I just hardly ever used the GoPro—there is no time for photos when you’re cycling all day!

Gear List
To review, here’s everything that went into putting together this part of my cockpit.
- Light: kLite ULTRA Adventure Lighting System
- Grip Tape: Supacaz Super Sticky Kush
- Grips: Redshift Cruise Control Drop Bar Grips
- Aero Bars: Redshift Quick-Release Clip-On Aero Bars (L Bend)
- Grips: Wolf Tooth Components Karv Grips (for aero bars)
- Phone Mount: Peak Design Out Front Bike Mount V2
- Garmin Mount: Garmin Edge TT/Tri Bar Mount x 2
- Satellite Messenger: Garmin inReach Messenger
- Garmin Mount: jefe kLite InReach Mini / Mini2 Mount Adapter
- Computer: Garmin Edge 1040 Solar Bike Computer
- Stem Cap: jefe Headset Cap Airtag Mount
- Tracker: Apple AirTag
- Camera: GoPro HERO12 Black
Detailed View

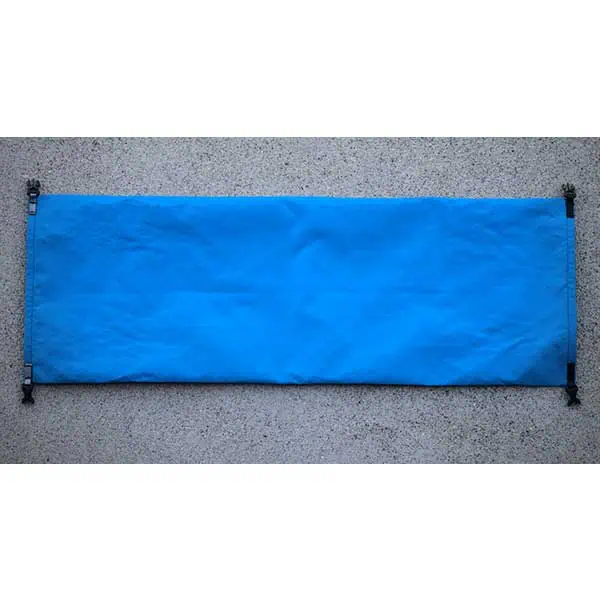
Rogue Panda Blue Ridge Handlebar Harness
The Rogue Panda Blue Ridge Handlebar Harness is new this year, and I am excited to use it on the Tour Divide. Two connected 12 in / 300 mm carbon fiber poles attach to your bike’s handlebars (which complicated my cockpit setup a bit). The harness keeps your front roll out of the way of your handlebars, cables, and hands. It comes with either plastic or Austere Mfg cam buckles. I opted for the latter for the sake of durability. Rogue Panda recommends a load of no more than 6 lb /3 kg. I’ll store my shelter, poles, and quilt in it, which is only about half that.
8.5 oz / 240 g
Rogue Panda Gila Dry Bag (Ultra 200X, Small)
I’ll use a Gila Dry Bag from Rogue Panda to store my gear on the Blue Ridge Handlebar Harness. The small size (the one I have) is still a bit large at 12 liters. There’s no way I would have room for the medium or large on my bike. Its diameter is 6.5 in / 16.5 cm, measures 22 in / 56 cm when rolled three times on each side, and measures 33 in / 84 cm when laid completely flat. I got the bag in Ultra 200X, but it’s customizable and available in various fabrics and prints.
5 oz / 140 g

Rockgeist Honeypot Feedbag (1 x Ultra 400 Black, 1 x X50 Marigold)
Feedbags are small bags behind your handlebars (closer to you) where you can store water bottles, food, rocks, unpopped popcorn, or whatever else your heart desires. I got two Rockgeist Honeypot Feedbags with the Rockgeist Spacelink Adapter for my Tour Divide setup. The Spacelink works well to keep the bags firmly attached to my bike, and the two bags hold 1.8 liters (when fully extended), allowing me to reach my hand to the bottom, have an exterior pocket, a drainage hole, and weigh approximately 3.6 oz / 102 g (but this depends on fabric choice).
3.6 oz / 102 g (each)

Camelbak Podium 21 oz / 600 ml
I am carrying a Camelbak Podium 21 oz / 600 ml water bottle in one of my Honeypot Feedbags. This will be the bottle I drink out of while riding and the one I fill with whatever flavored electrolyte-filled beverage I am drinking instead of water. I’ve used this bottle extensively during my training, and I’ve been happy with it. Why not an insulated version? Why do I need an insulated version? All that does is cut down my water capacity.
3.2 oz / 91 g
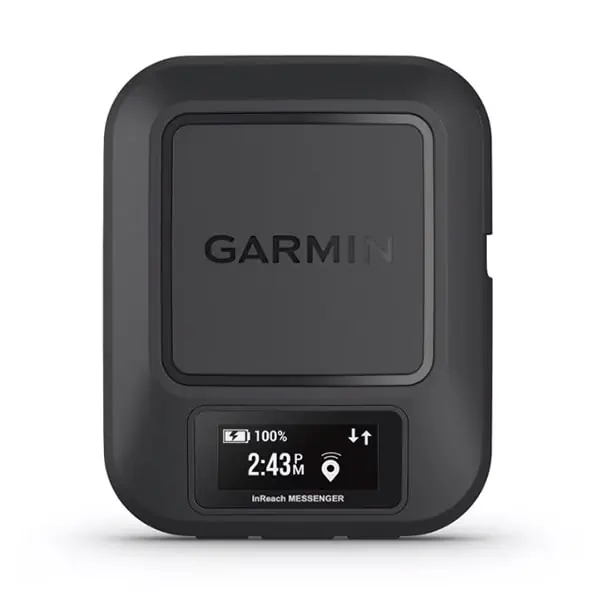
Garmin inReach Messenger
I’m bringing a Garmin inReach Messenger instead of my Garmin inReach Mini 2 on the Tour Divide because of the difference in battery life. I’ll use this to track my location on Track Leaders (I think? It’s still unclear how this works) and save me if something goes wrong. I got an attachment (I used VHB tape to attach it since the Messenger doesn’t have a screw on the back like the Mini 2), so it can be attached to one of my aero bar mounts. However, I’m still debating whether it’s better to keep it on my person instead (you know, in case I get thrown off my bike and need to call for help from down a cliff).
4 oz / 113 g

kLite ULTRA Adventure Lighting System
Something I learned was a thing while putting together my Tour Divide rig was a dynamo hub. What’s a dynamo hub? It’s a magical wheel hub that produces power as your wheel turns. I got the kLite ULTRA Adventure Lighting System to attach to my dynamo, which is a pretty awesome system that allows me to have a passively powered light and the option to charge USB devices. There is a switch I have attached to my bike’s stem that diverts power from the light to the USB bank.

Garmin Edge 1040 Solar Bike Computer
Instead of using my watch to track my ride, I’m using a Garmin Edge 1040 Solar Bike Computer. I went with this model mostly because it has the largest battery and can recharge via the sun. It also has maps, navigation, and all the cycling stats I could ask for (especially when paired with the Speed and Cadence Sensor).
4.7 oz / 133 g
Supacaz Super Sticky Kush
I’m not going to lie; the grip tape that came stock on my Salsa Cutthroat was garbage. It was peeling off in various spots after only a few hundred miles of use. It’s disappointing for a brand-new bike and not inspiring regarding the other components. I bought and installed a roll of Supacaz Super Sticky Kush grip tape myself. I think I did an acceptable job for it being my first time; surely, it would have been an unacceptable job if I had taken it into a shop to be done, but it was okay by me.

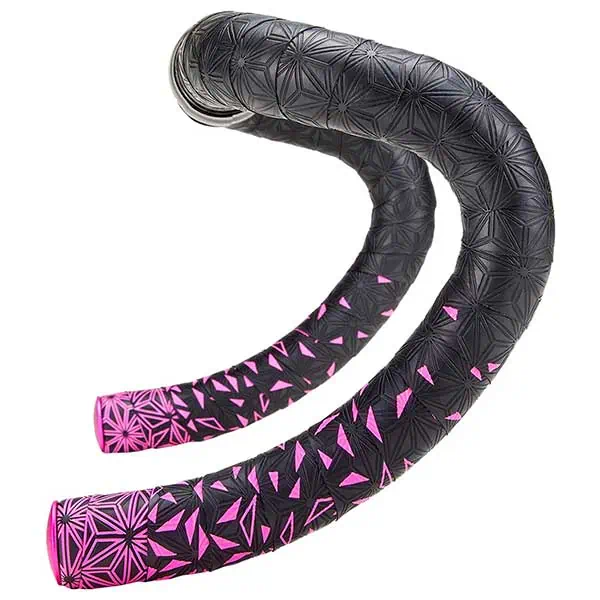
Redshift Cruise Control Drop Bar Grips
On my previous long-distance bicycling journeys across Australia and Arizona, I learned that extended pressure on your hands from your handlebars can result in numb or tingling hands and fingers. Hopefully, the Redshift Cruise Control Drop Bar Grips will alleviate some of this risk on the Tour Divide. There are two grips, one on the handlebars’ top (straight part?) and the other at the ends after the drop. I’ve found both comfortable during training and hope this will remain the case on the Divide.

Redshift Quick-Release Clip-On Aero Bars (L Bend)
Hand grips and positions aren’t limited to the stock handlebars. The Redshift Quick-Release Clip-On Aero Bars (L Bend) give me another position to hang out in; they’re used for comfort, not for being aerodynamic. Spending all day on the bike is taxing on the body—even just sitting in a chair can be uncomfortable after long enough—which is why having multiple hand positions on the bike is important. I’m a fan of the aero bars; I can’t picture my bike without them.

Wolf Tooth Components Karv Grips
I put the Wolf Tooth Components Karv Grips on the ends of my aero bars for better grip and comfort. It wasn’t easy to get these grips onto the aero bars, but with the help of some K-Y Jelly (at the recommendation of my friend SlingFin Tim), they went on without issue. However, I think they’re now permanently affixed to my aero bars, and the only way to get them off will likely be to cut them off with a razor.

Peak Design Out Front Bike Mount V2
I was going to save this for the cockpit breakdown, but I felt it worth bringing up the Peak Design Out Front Bike Mount V2 here as it’s an awesome piece of kit. Paired with the Peak Design Everyday Case, it allows me to quickly and securely attach (and detach) my phone from my bike. My one worry is that all the vibration from the ride will be transferred into my phone via the mount and do some serious damage (this happened to my phone during my Australia bicycle tour with a similar product called the Quad Lock). We’ll find out after 2,700 miles (4,300 km) of bouncing down gravel roads.

Garmin Edge TT/Tri Bar Mount
Another thing I took a long time to figure out (as part of my cockpit) was how to mount my Garmin. I thought I had it all figured out until I realized that with the standard Garmin mounts, you need to rotate your Garmin device 90 degrees to lock it into place. With the Garmin Edge TT/Tri Bar Mount, you move a little toggle to lock the device into place, so there’s no need to rotate it. My Garmin Edge 1040 Solar Bike Computer can be mounted securely without additional space on either side.
jefe Headset Cap Airtag Mount
The jefe Headset Cap Airtag Mount conceals an Apple AirTag in a bicycle’s stem. This isn’t strictly necessary on the Tour Divide, but it provides me with a small peace of mind that should something happen to my bicycle, I will (maybe) be able to locate it. I will say that it was helpful to track my bicycle as it made its way to Canada on the airplane (I took a direct flight to minimize potential luggage issues). The only issue I had was that it was difficult to remove (unscrew) following my ride.
1.06 oz / 30 g
You’re probably not looking at this gear list hoping to find a new phone, but I get asked which phone I am using often enough that I’ve decided to include the Google Pixel 8 Pro. I’m not an iPhone fan, so I stick with Google. This thing has a killer camera and will be used extensively for navigation and taking notes (in addition to some photography).
7.41 oz / 210 g
Peak Design Everyday Case
Peak Design makes both excellent camera and phone accessories. The Peak Design Everyday Case has a magnet that allows me to attach my wallet and various optional mounts that make using my phone in my car or on my bicycle a breeze. Does any of this help hiking? I guess not, but this is an awesome case and is officially part of my pack.
1.5 oz / 43 g
What do we think? Do you have any suggestions, critiques, or questions about the gear? I’m always happy to talk gear, though I often hesitate to admit it. Leave a comment below and let me know your thoughts.
Affiliate Disclosure: This page may contain affiliate links, which means I may receive small commissions for purchases made via these links at no additional cost to you. This helps pay the bills and keep the site up and running. Thank you for your support!