Japan’s Most Dangerous Hike: The Okuhotakadake – Nishihotakadake Traverse
The most dangerous thing you will encounter on most hikes in Japan is probably dehydration or perhaps one of the giant Japanese hornets if you’re unlucky enough to catch one on bad day.
However, the number one killer of hikers and people in the outdoors is not bears, snakes, ax-murderers, or even the chupacabra – it’s falling.
And falling is exactly what you have the opportunity to do at many times during this most magnificent (and dangerous) of hikes: the Okuhotakadake – Nishihotakadake Traverse.

When I first heard about this hike, I got excited since it:
- had a dotted line and lots of red writing on the map at the trailhead,
- apparently takes upwards up eight hours to complete a 1.9 mi / 3.05 km section, and
- everyone I mentioned the trail to told me how awful and dangerous it is (which is expected whenever you talk about anything remotely challenging in Japan).
After having completed this traverse I can say that I was not disappointed with the hype.
The centerpiece of this hike, a 1.9 mi / 3.05 km traverse spanning the gap between Japan’s 3rd and 29th highest mountains, took me five hours to cross. It’s no joke.
Most hikers wear helmets to fend off falling rocks (I made it through without one), and some even carry (and use) ropes to aid the many ascents and descents (bringing rope is a bit overkill). In addition to the over-prepared hikers, there was (as usual) plenty of chains affixed to slopes throughout the traverse to detract from the beauty and isolation of the mountains.
Also, you will be using your hands a lot during this “hike”. If you’re a fan of gloves (aka you have sensitive baby hands) I suggest packing some.

THE BASICS
- Location: Kita Alps (北アルプス)
- Max elevation: 10,470 ft / 3,190 m
- Distance of traverse: 1.9 mi / 3.05 km
- Distance from Hotakadake-sansō to ropeway: 4.53 mi / 7.29 km
- Distance from Shinhotaka Onsen to ropeway: 10.61 mi / 17.07 km
- Difficulty: Very Strenuous
- Water on trail: Yes (at lodges – if open)
- Trailhead facilities: Parking, bathroom, lodge, drinks, food
People are always quick to advise you how dangerous things are or how careful you should be in certain situations, even if said people have never before engaged in or experienced whatever it is you’re thinking of getting up to (hitchhiking is a great example of something people love to do this with).
Most of the time these people are best left respectfully ignored.
However, having now successfully completed this traverse, I am here to tell you that it is actually dangerous (there are plenty of opportunities to fall to your death). I would definitely not attempt this in wet or windy weather, and if you are not comfortable with heights or climbing (with your hands), then I suggest sitting this one out.
Seriously, be careful.


GETTING TO THE TRAVERSE
You can reach the traverse a number of ways, but the most direct access is from Shinhotaka Onsen (新穂高温泉) or Kamikōchi (上高地). The directions described here are from Shinhotaka Onsen because private cars are not allowed through to Kamikōchi (you need to take a bus). For more information on Kamikōchi, you can check out their (English language) website here.
- Accessible via public transportation: Yes
- Trailhead parking: Yes
- Trailhead coordinates: 36.286281, 137.575869
- Northern terminus coordinates: 36.289169, 137.648057
- Southern terminus coordinates: 36.279005, 137.629023
BY CAR: Via car, the trailhead can be reached fairly easily. There is a free parking lot for hikers at the Ryokan Shinhotaka Okuhida (map). From here you will need to walk up the road a bit to the base of the ropeway (where you can then decide which way to take on the trail).
BY TRAIN: Sorry, no train station near the trailhead.
BY BUS: From Takayama Station (高山駅) in Gifu (it’s a train station) take the bus bound for Shinhotaka Onsen (新穂高温泉) to the last stop. It takes about an hour and a half, and the first bus departs Takayama Station at 7:00.
If you’re farther north, you can also take a bus from Matsumoto Station (松本駅) in Nagano.
THE HIKE
As I said before, this traverse can be approached a number of different ways. I decided to head clockwise and took the Shinhotaka Onsen route up to Okuhotakadake; my post on this hike can be found here.
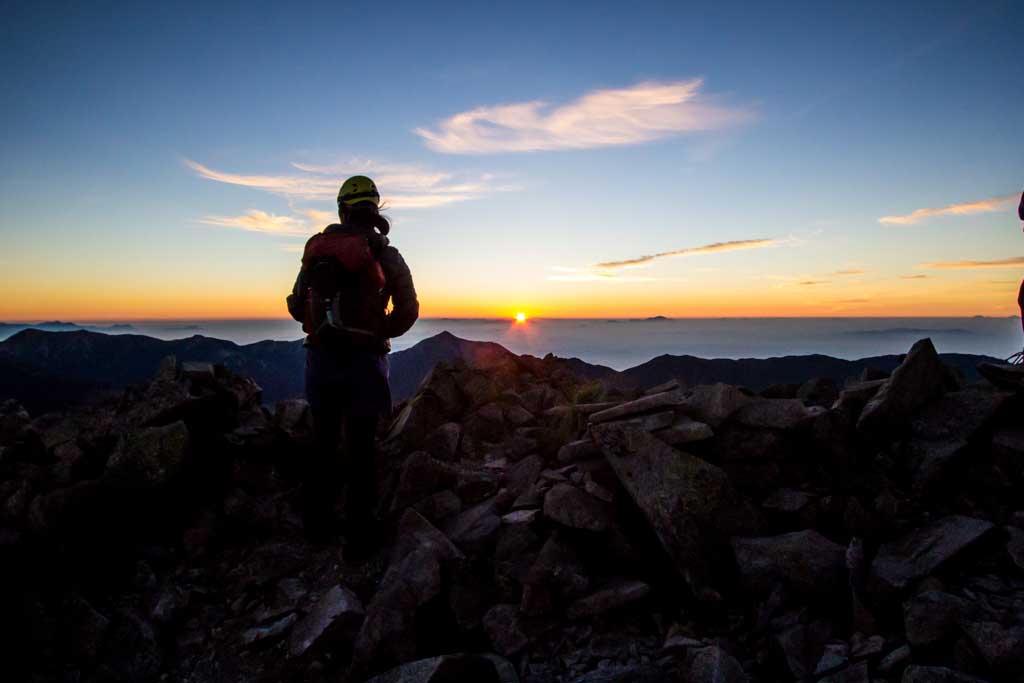
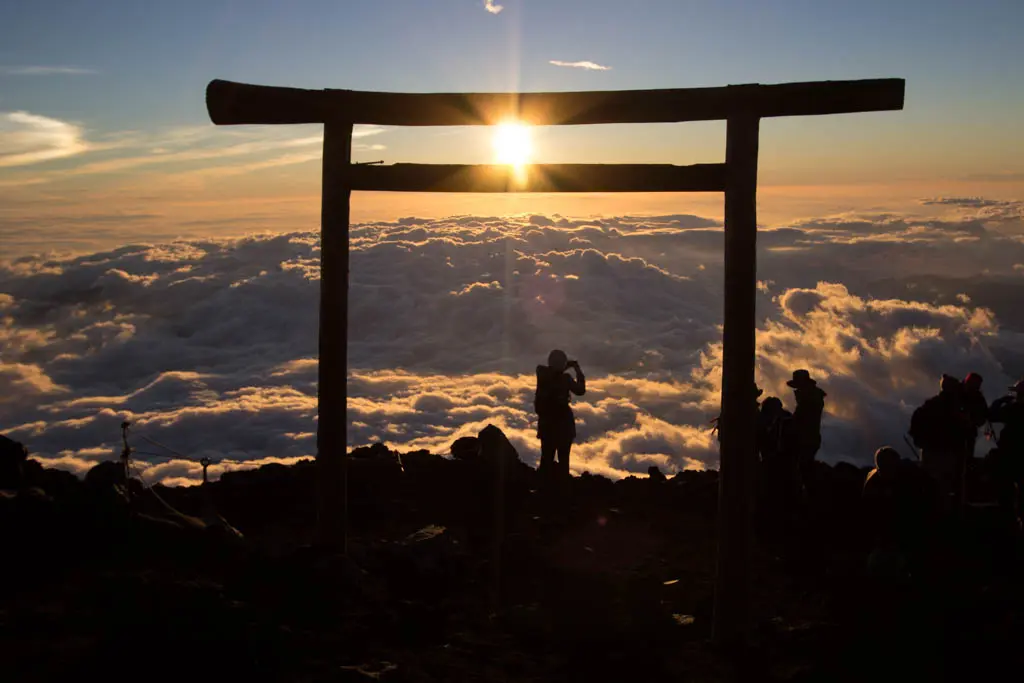
I camped next to Hotakadake-sansō (穂高岳山荘), the Hotakadake Lodge (website, Japanese only), and woke up to catch the sunrise from the summit of Okuhotakadake (and to give myself plenty of time to complete the hike).
Hiking up to the summit only takes about thirty minutes, and I was not alone in my endeavor – plenty of others had my brilliant sunrise hike idea.
However, once you continue south past the summit of Okuhotakadake, you will find yourself relatively alone (I think that counterclockwise may be the more popular direction for attempting this hike).
You begin by climbing across and down a razorback ridge with steep dropoffs on either side. The trail is marked with X’s meaning “this way is not a good idea” and O’s meaning “this way is a slightly less worse idea” – so keep an eye out if you’re feeling lost (although these markers are far too abundant and really detract from the beauty of the mountains).
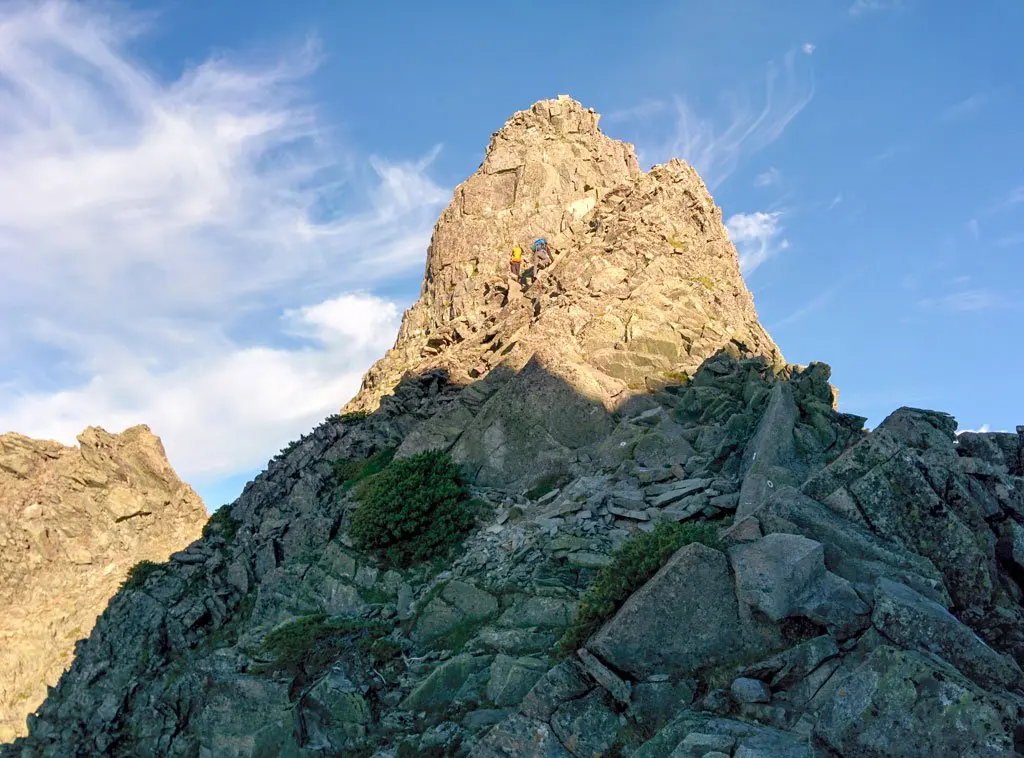
After fifty minutes of hiking I made it to the base of what might be the hike’s most well-known landmark, the Gendarme (ジャンダルム). This 10,377 ft / 3,163 m summit is a must-climb along this route and it will only take you an extra ten minutes or so to reach the top.
You get a nice look back at where you’ve come from (and hopefully further north as well), and an even better look at where you’ve got to go (spoiler alert: lots of up and down).

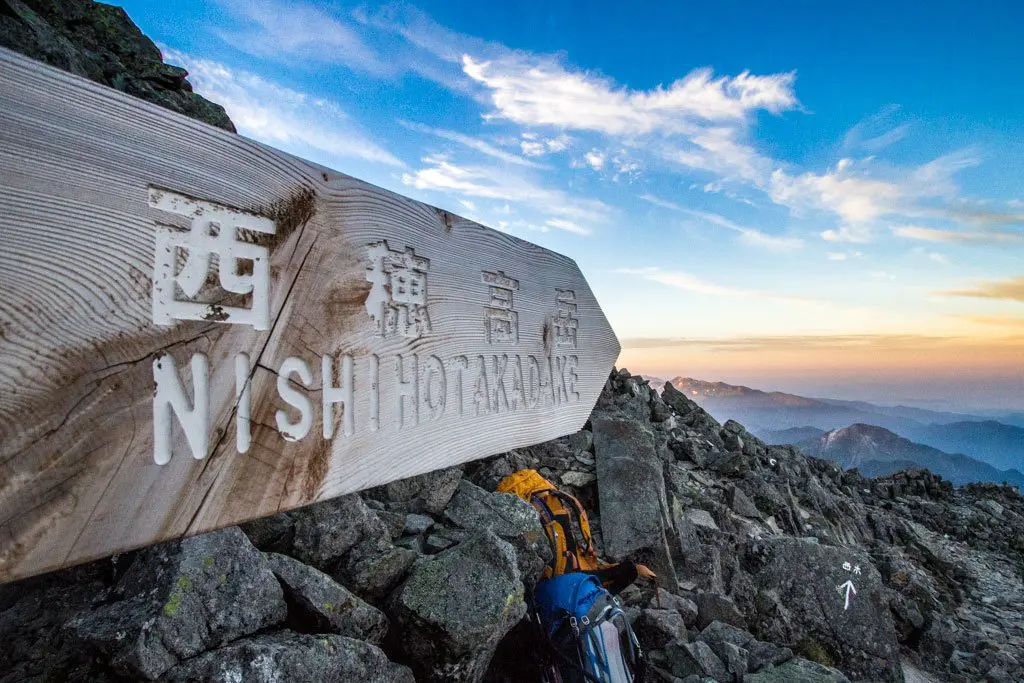
South of the Gendarme, the trail has as it heads towards Tengudake (天狗岳), then Ainodake (間ノ岳), and then finally Nishihotakadake.
The obnoxiously placed chains affixed to the mountainsides do a great job of getting in you way, so do your best to avoid them (or use them, if that’s something you’re into).
More importantly look out for people climbing (and kicking rocks down from) above you; many times the trail can only accommodate one hiker at a time.


MAP OF THE OKUHOTAKADAKE – NISHIHOTAKADAKE TRAVERSE
The following was the route my GPS recorded on my hike of the the Okuhotakadake – Nishihotakadake Traverse.
I have no guarantee that this route is correct, nor that it can be accurately relied upon for backcountry navigation. It should serve only as a general guideline for what the trail is expected to look like.
And here’s the elevation profile for the traverse (starting at Hotakadake-sansō and ending at Nishihotakadake):


Conclusion
This traverse is my favorite hike in Japan, and I would love to get out and do it again.
In addition to being a serious challenge, it can be done as part of a multiday trip (if you started with a climb up Yarigatake and then traversed all the way to Yakedake, that would be an epic trip).
Have any questions? Want another post about another one of Japan’s mountains? Have a suggestion to improve this information?
Leave a comment and let me know!


Hey,
I’m heading out to kinda thru hike the Kita alps. Since my time is very limited (due to Japanese working schedule) I won’t be able to to it in one push. So, gonna be connect the pieces. I’m kinda new to thru hiking, but familiar with alpine terrain, so I wonder if you would go for the traverse using trail runners or rather not to heavy mountain boots.
Heading out for hiking from Tateyama to Yarigadake this summer and wonder which kind of shoes would your first choice be.
Thanks for your great work, really enjoyed your website.
Tom
I have only ever used trail runners in Japan – including when I thru-hiked the Kita, Chuo, and Minami Alps.
Thanks, man! That’s super helpful for me.
Happy to help! Shout with any other questions!
This post inspired me to fastpack the Kamikochi-Yari-Daikiretto-Okuhotaka-Nishihotaka-Yake traverse over 2.5 days this week. It was indeed quite the epic journey and all the hands-intensive ups/downs made it super fun (and zombie-like exhausting). I recently moved back to Japan and am looking at hitting several trails, and am interested to see what came out of your trans-alps journey. Thanks for all the thought you put into your trip reports.
Sounds like an awesome trip!
Hello! Have you crossed the Daikiretto? Any thoughts on whether the Nishihotakadake traverse would add much to an itinerary that already includes the Daikiretto? I’m hoping to do the Kamikochi – Yarigatake – Daikiretto – Panorama Course – Kamikochi loop in autumn since the Karasawa Col is supposed to look amazing in autumn, but your post has made me consider replacing the Panorama Course section with the Nishihotakadake traverse. Let me know if you are able to recommend anything!
I have not yet crossed the Daikiretto, but I will be crossing it sometime this summer during my traverse of the Japanese Alps. I might not have anything posted by then but I’ll probably have photos on my Instagram at the least?
That said, I definitely recommend doing the Nishihotakadake Traverse.
Hey Mac, I’ve been planning a multi day traverse starting from shinhotaka onsen and using your guide to mt yari. After spending a night on mt yari, I plan on hiking the daikiretto all the way to mt okuhotakadake where I will spend the night, I would like this route you described in this article to cap off the trip, but I’m curious about a few things. What time do you estimate you made it back to shinhotaka after completing this section? My issue is that I need to be back down rather quickly so I will be able to get on a train and arrive in kyoto that night. My check in at my hostel is 9:00pm and I estimate the time of trains and other transport to be between 4-5 hours to be safe. Love to hear any feedback.
I got there in the afternoon but I can’t say for sure when. It might be ambitious try to make it to Kyoto by 21:00. Definitely get an early start and be ready to accept not making it.
Hi! Thanks for writing this great article! It is the most informative thing I’ve found on doing this hike. I’m planning to do it as a multiday hike at the end of September in a clockwise direction starting at the Shinhotaka ropeway ending at Kamikochi (via hotadake, the daikiretto, Mt Nakadake and Mt Yarigatake). How long did it take you to get from the ropeway to the Hotadake Sanso hut? I’ve found something online saying that it takes 8.5 hours which seems too long for the distance and elevation gain. From Minamidake did you head onwards to Yarigate then clockwise to Yarisawa, Yokoo Sanso and Kamikochi? Most things I have seen online describe an anticlockwise hike starting at Kamikochi. Can you see a reason (eg the terrain of the Daikiretto) why anticlockwise would be better or safer? It makes sense to me to use the ropeway to gain a bit of elevation. Also is the trail fairly well marked? So looking forward to this! Thanks!
From the rope way to the the Hotadake Hut does take a long time. The trail is a lot of scrambling and near-vertical up and down between those two points. I think it took me something like 5.5 hours.
On this hike I did not continue on to Yari – you can drop down from Okuhotakadake and make your way back to the bottom of the rope way.
Can’t see a reason why one direction would be better than the other. The trail is well marked (when there is a trail) – white blazes lead the way – ‘O’ for “this way” and ‘X’ for “not a good idea”.
Hi, great piece. We are planning to hike some of the trails in the Kita alps, this week. We want only 1 overnight and day trips though. Do you think that two strong hikers/climbers (we live in California and hike/climb in the sierra nevada often) can accomplish this trail in one overnight?
Also, as an alternate, we were thinking of doing the daikeretto traverse to yari then down. Could this be done with a single overnight? We plan to stay in a hut in order to keep light and fast. On both of these routes, we plan to use the shinhotaka rope way to speed our hikes from the shinhotaka valley where we are staying.
Any day hikes you like in the area?
Thanks!
You could definitely do this in one night. I did.
Your alternative route could also me done. So long as you aren’t planning on hiking this when there’s going to be snow around.
You could day hike a lot of the peaks, but they will be long days.
Planning on doing this this weekend, wondering how you would compare the level of difficulty with Mt Fuji?
Mount Fuji is a cake walk compared to this.
Hi Mac, thank You very much for the great post, the stunning photos!
Reading the post and the comments it is still not clear if I should try this trip or not. I would go with my brother, but we are not experienced in climbing at all. I don’t know how do people mean a trip to be difficult. Is it difficult because you need to be fit or because you need to have a lot of skill? I have not tried to climb up on a vertical wall nor climbing with equipment yet, so regarding the skill I have some deficiencies. I would love to do this trip, but only without taking any crazy risks.
Thank You very much in advance! – Phil, Hungary
Hey Phil – this trip definitely requires some physical fitness, but more importantly I would say that it requires that you be comfortable climbing with your hands and feet. You don’t need to be an experienced mountaineer to complete the trek, but you certainly need to be comfortable with heights and with climbing (both up and down).
Hi Mac, thank You very much for the information!
I stumbled on your blog as I’m planning a trip to Japan for this August, and I just want to say that you are awesome! I love your writing style, and the information you give is exactly the kind that I’m always looking for but always struggle to find when I plan hikes in other countries. Thank you for taking the time to put all this out there for the rest of the world, and keep having great adventures! -Alex, USA
Thanks, Alex! Definitely have been trying to make the information on hikes in Japan as comprehensive as possible. Happy to hear you like it.
Thanks for this post. Do you know what months are best for this hike? I will be there end of March; I assume there will be too much snow to do this without crampons.
Will definitely be too much snow in March. I wouldn’t attempt this one until mid-July (basically, not until ALL the snow/ice is gone).
Hey,
This definitely sounds like a firm scramble, not a hike. If you have to use a helmet or all four limbs, then that’s moving up into Class 4 territory. Please review this and the YDS system (or choose some other system to judge by, keeping it consistent). I wouldn’t want any casual hikers to think that scrambles like this are actually hikes. Otherwise, great article! A good amount of detail. Thanks.
This is true, but “Japan’s Most Dangerous Class 4 Scramble” just doesn’t have the same ring to it. I tried to make it very clear in the post that there is a fair bit of climbing and risk involved with this trail.
I agree. Only experienced climbers should be attempting this trek. In 2017, the death toll was 28 in the Northern Alps alone. This is a YDS Class 4~5 route (Check link for Nagano Trail Guide). I have 10+ years experience, and I’m still leaving this route for later. Please make sure you are encouraging people to follow the guidelines of the Nagano Police Department. By law, a detailed trekking itinerary must be submitted, and mountain insurance is recommended.
Hello!! I only have a few days to explore Japan’s mountains, starting and ending in Tokyo and I really want to do something that is not touristy, and if I’m lucky a bit epic. I will be travelling on my own though and I don’t want to do anything that is too dangerous. For a relatively fit person with hiking and bouldering (mostly indoor) experience, if I was really careful would this be ok? It sounds amazing. (At the risk of sounding like a crazy stalker- how would this compare to the scrambling-y section of Pedra de Gavea in Brazil? I loved that hike so much and have been craving something similar.) Do you have any other recommendations? I don’t want to spend too much time sitting on the train but I want to get out and do something great. My dates are Nov 7 (am)-11 (fly home) so Winter will be starting I think… Thank you so much!
This is definitely more intense than Pedra da Gávea, but if you’ve been in a climbing gym before, then I see no reason why you wouldn’t be capable of doing it. I am not sure what the weather is like now, but if it has started to snow then I would definitely not attempt this hike. If you get out there be sure to report back and let me know! Have fun and be safe!
I think there will be snow so I will have to pass 🙁 (Or not pass, depending on how you look at it.) Thanks so much for getting back to me!