
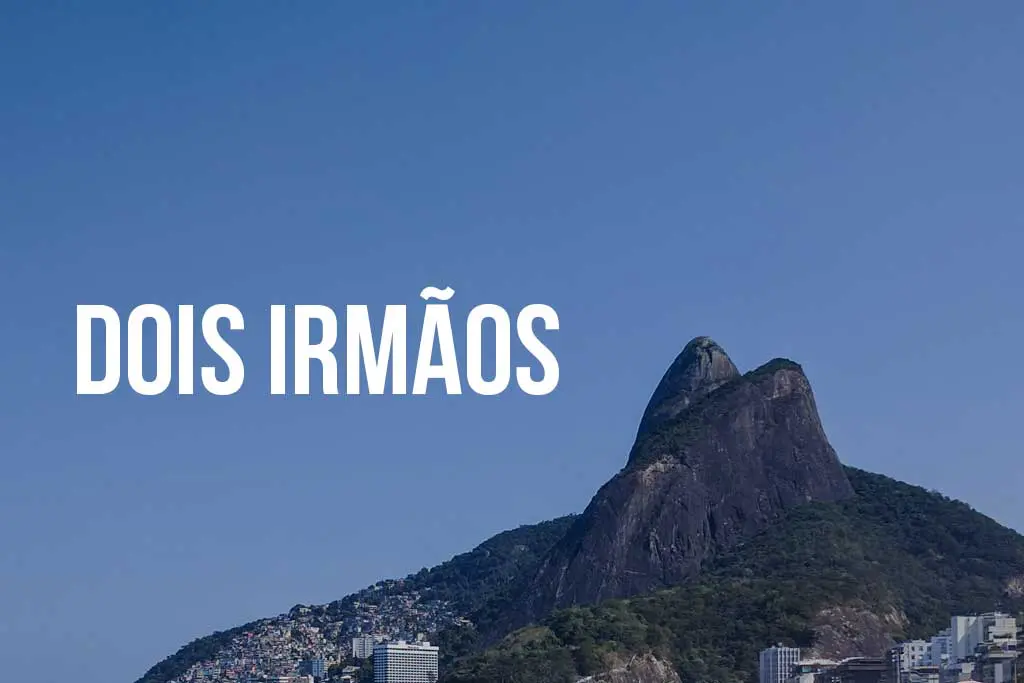
Hiking Pedra da Gávea via Garganta do Céu
Have you already hiked Pedra da Gávea and are looking for another equally (or more) challenging hike in Rio de Janeiro?
How about hiking Pedra da Gávea – again! That’s right, there’s a second trail up Pedra da Gávea – a secret way. Okay, maybe not truly secret, but definitely lesser-known. If you’ve ever heard of hiking Pedra da Gávea via Garganta do Céu or Pico dos Quatro, then this is the trail you heard about.
The best part? It’s truly another trail; except for the first bit of hiking, this trail is completely separate from the main trekking route – no “meeting up with the main trail” halfway up the mountain. I know, I too was excited when I heard about this – so I went and did it.
- Location: Barra da Tijuca, Rio de Janeiro
- Summit elevation: 2,769 ft / 844 m
- Elevation change: 2,474 ft / 754 m
- Round-trip distance from trailhead: 3.2 mi / 5.2 km
- Round-trip time from trailhead*: 5 hours 30 minutes
- Difficulty: Strenuous
- Water on trail: Yes
*Note: The round-trip time listed above is based on my own experience. Please remember that your time may vary greatly.

How to get to Pedra da Gávea
- Accessible via public transportation: Yes(ish)
- Trailhead parking: Yes
- Trailhead coordinates: -23.002268, -43.295772
- Summit coordinates: -22.998183, -43.284498
The Pedra da Gávea trailhead is located on the eastern side of Barra da Tijuca.
BY CAR/UBER: Driving to the start of Pedra da Gávea is relatively straightforward. However, if you don’t have access to a car (but maybe even if you do), I would suggest taking an Uber to the start of the trailhead (although it isn’t a bad walk from Jardim Oceânico – the westernmost stop on the metro (you can also tax an Uber from here). Driving instead of walking to the trailhead saves 230 ft / 70 m of elevation gain.
BY METRO: If you take metro line 4 (the yellow one) to >Jardim Oceânico, you can walk or Uber the remaining 1.4 mi / 2.3 km to the trailhead. The walk is relatively straightforward but will require you to cross in one semi-sketchy spot where cars don’t stop or slow down.
Walking, taking the metro, or taking a bus, you will come to a roundabout where you have to take the northernmost exit. Leaving the roundabout, you’ll pass a guarded gate at the bottom of a very steep road. You don’t need to stop and check in here – just wave hello to the gate-person and follow the road up. Continue up the road until you think that it may have ended, then follow it (up) a bit further. The road takes a left and flattens out as you begin to approach the Pedra da Gávea trailhead.
Follow the main Pedra da Gávea trail until you reach the signs “Pedra da Gávea, left; Cachoeira (waterfall), right”, go right.


You can either drop down to the creek and climb up the other side after crossing or continue a short way past the signs and cross the creek at the top of the waterfall (which isn’t much of a waterfall).
At this point, I must advise you that if you “can’t find the trail,” then this might not be a good route for you to take (especially if you’re alone).
It only gets worse (or more exciting, depending on how you look at it).
Pedra da Gávea via Garganta de Céu Trail
This route is by no means easy, and it should not be attempted unless you’re comfortable following an overgrown and sometimes unmarked trail (but there is a trail to follow).
Once you leave the waterfall, you’ll begin to climb, and you won’t stop until you’re about two-thirds up the mountain (one and a half to two hours of climbing).
By distance, this is the shorter of the two routes, but it’s certainly more tiring (so it’s not necessarily quicker).


The trail appears to have been clearly marked at one point, but the arrows that once led hikers up the mountain have been blacked out (but you can still see them, so I suppose they are still guiding hikers up the mountain).
Should you find yourself feeling a bit lost, just look for one of these black splotches on a rock and make out which way the arrow is pointing (probably up).
After about two hours of uphill hiking you will emerge from the thicket encasing the trail and find yourself on the saddle between Pedra da Gávea and Pico dos Quatro.

To your left is the trail up to Pedra da Gávea; to your right is the trail up Pico dos Quatro (where there is no view and nothing to see).
However, in front of you there is a trail down to Garganta do Céu.
Down!? Yes, down, but don’t worry. It’s very short and absolutely worth the elevation loss (I’m a stranger on the internet, you can trust me). Follow it down for a few dozen meters, and you’ll find yourself somewhere arguably more impressive than the summit: Garganta do Céu.


Once you’ve had your fill of glory at the “Throat of the Sky” return to the saddle and follow the trail up towards Pedra da Gávea.
The trail here is quite steep and you will probably need to use your hands. After a bit of climbing, you will come to the first of two rock faces you’ll have to climb.
This is also the part where you should probably turn around if you don’t have climbing gear or aren’t comfortable in exposed and unprotected climbing.


The first rock face no longer has a cable to assist in the climb. This greatly increases the difficultly of the climb up this face and I would not recommed it unless you have climbing gear or are an experienced climber. A fall here would very likely result in you dying. A rusty metal cable hangs down to assist the first climb, and I saw no way around using it to get up. In the process I managed to slice my arm and get a splinter of the cable stuck in my hand – gloves are recommended.
The second cable, a short way after the first, is less rusty, but you should still use caution when grabbing it (I’m warning you, little metal splinters are not fun to dig out of your hands).
When you get to the top of the second climb you have one more short hike up, over, and past another rock face (this one can be easily crossed laterally).


Pedra da Gávea Summit
You come up onto the summit from the south, and the typical “take photos and sit here” area will be to your right (this is where the views of São Conrado and Zona Sul are).
North of you there is another bit of rock even higher than where you are when you first arrive on top. It’s worth heading over there as well.


The trip to the northern side of the summit requires that you descend a small section of rock via a chain and then climb up a (usually) wet section, but it’s nothing as wild as what you just came up.
When you reach the other side, it is also possible to climb onto the highest rock, but it will require a small jump and some faith in your shoes’ grip strength.


When you’re ready to head back down, I suggest descending via the main route.
Getting back down the cables (the way you came up) is doable, but the rocks were slippery when I climbed and I didn’t feel confident enough in my grip to make it safely back down.
The main route down is via the western edge of the summit—the trails crisscrossing the top lead to it.

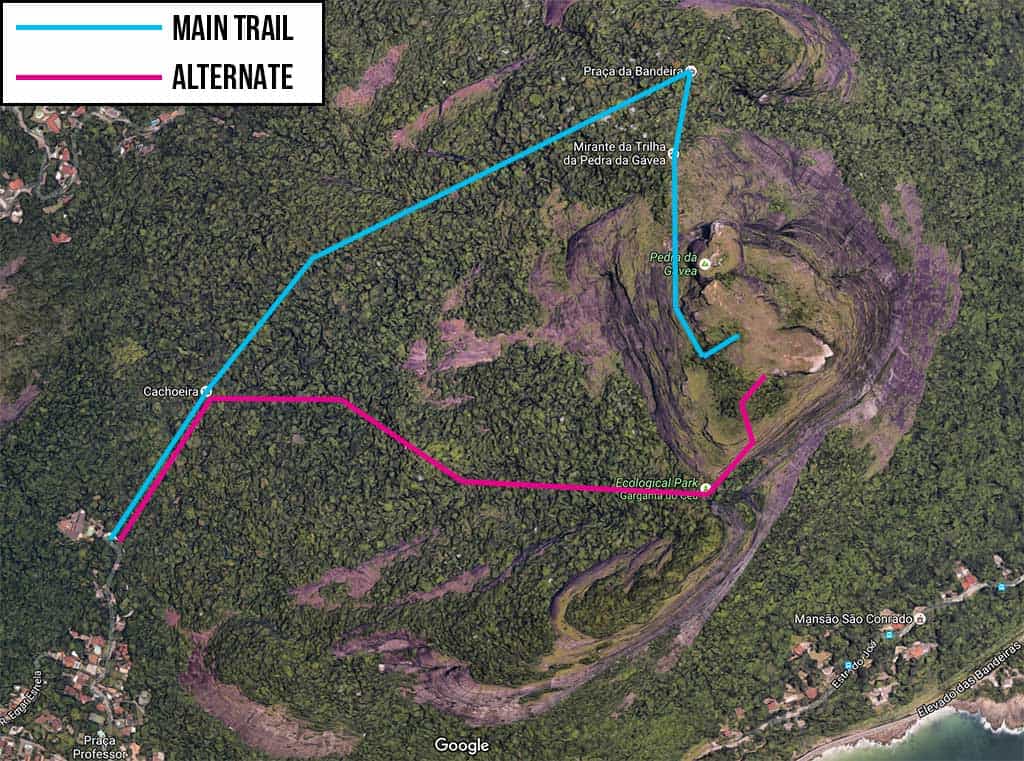
Map of Pedra da Gávea
My GPS recorded the following route up Pedra da Gávea. The main track is further north, the Garganta do Céu alternate is further south.
I have no guarantee that this route is correct nor that it can be accurately relied upon for navigation. It should serve only as a general guideline for what the trail is expected to look like.
Conclusion
When I heard about this alternative, the main track up Pedra da Gávea was my favorite hike in Rio de Janeiro.
After doing it, I can tell you that I’ve changed my mind – this route is now officially my favorite hike in Rio de Janeiro.
Have any questions about hiking Pedra da Gávea? Want another post about another one of Brazil’s hikes? Have a suggestion to improve this information?
Leave a comment and let me know!


I have never used any climbing gear so I or free climbed so I don’t imagine myself doing it here, but would it be worth doing the first part of it just to go to the Garganta do Ceu?
If you’re not concerned with getting to the top, I would say that visiting Garganta do Céu is definitely worth the trip on its own.
Hey Mac. Thanks so much for putting this together. It was really helpful in my hike up Pedra da Gavea (yesterday). One really important thing, however, is that the first cable up the rock face is no longer there. As such, it is essentially impossible to do the alternate route without proper rock climbing equipment. I got extremely lucky as the moment that I was there, there was a park official with full gear climbing down. He let me use his rope to get up. But, if that hadn’t been the case, there was no way I would’ve made it. Might be the case that they replace the cable in the future, but I wouldn’t count on it. The second cable is still there.
Good call, Adam! I actually hiked this last year and found the cable missing as well. I managed to get past it, but it was probably an unwise risk – a very long fall on a very exposed section. Would definitely not recommend it. I’m glad you made it there at the right time and were able to get a hand to get up safely.
I’m sitting in a meeting in a windowless office.
You should start a blog.